Progressive Delivery using Flagger Enterprise
Flagger is a progressive delivery operator for Kubernetes. It is designed to reduce risks when introducing new software versions and to improve time to delivery through automating production releases. Weave GitOps Enterprise's UI allows you to view the state of these progressive delivery rollouts, and how they are configured using Flagger's canary object, through the Applications > Delivery view.

This guide uses Flux manifests to install Flagger and Linkerd. Flagger can work with a number of service meshes and ingress controllers, to support various progressive delivery deployment strategies:
![]() Canary Release - where traffic is gradually shifted to
the new version and its performance is assessed. Based on this analysis of KPIs a release is either
promoted or the update abandoned.
Canary Release - where traffic is gradually shifted to
the new version and its performance is assessed. Based on this analysis of KPIs a release is either
promoted or the update abandoned.
![]() A/B Testing - uses HTTP headers or cookies to ensure users
stay on the same version of an application during the canary analysis.
A/B Testing - uses HTTP headers or cookies to ensure users
stay on the same version of an application during the canary analysis.
![]() Blue/Green - where tests are run against the
new version, and if successful, traffic is then switched from the current service.
Blue/Green - where tests are run against the
new version, and if successful, traffic is then switched from the current service.
![]() Blue/Green with Traffic Mirroring - sends
copies of incoming requests to the new version. The user receives the response from the current
service and the other is discarded. The new version is promoted only if metrics are healthy.
Blue/Green with Traffic Mirroring - sends
copies of incoming requests to the new version. The user receives the response from the current
service and the other is discarded. The new version is promoted only if metrics are healthy.
Using Flux allows us to manage our cluster applications in a declarative way through changes in a Git repository.
In this guide, we will walk you through a full end-to-end scenario where you will:
- Install the Linkerd service mesh
- Install Flagger
- Deploy a sample application using a canary release strategy based on metrics provided through Linkerd's in-built Prometheus instance
Prerequisites
- This guide assumes you already have a Kubernetes cluster running and have bootstrapped Flux. To apply the manifests listed in this guide, you will need to commit them to a repository being reconciled with Flux. For help installing Flux, you can follow their getting started documentation.
- Flagger requires the
autoscaling/v2orautoscaling/v2beta2API to be installed on the cluster, you can usekubectl api-resourcesto check which API versions are supported. - The step CLI installed to generate certificates in order to support mTLS connections.
Installing Linkerd using Flux
For the Linkerd installation, a Kustomization file will be used. This will allow us to specify the
installation order and the default namespace for the installed resources but also to easily generate
Secrets from certificate files via the use of a secretGenerator.
In order to support mTLS connections between meshed pods, Linkerd requires a trust anchor
certificate and an issuer certificate with its corresponding key. These certificates are
automatically created when the linkerd install command is used but when using a Helm chart to
install Linkerd, these certificates need to be provided. The step CLI allows us to generate these
certificates.
To generate the trust anchor certificate run:
step certificate create root.linkerd.cluster.local ca.crt ca.key \
--profile root-ca --no-password --insecure
To generate the issuer certificate run:
step certificate create identity.linkerd.cluster.local issuer.crt issuer.key \
--profile intermediate-ca --not-after 8760h --no-password --insecure \
--ca ca.crt --ca-key ca.key
Add the ca.crt, issuer.crt and issuer.key files to the cluster repository under a linkerd
directory.
To control where the Linkerd components get installed, we need to add a Namespace resource:
Now let's add the resources for Linkerd components under the ./linkerd
directory. These are:
- A
Namespaceresource to control where the components are installed - A
HelmRepositoryresource to make the Linkerd helm repo available on the cluster - A
HelmReleaseresource to install the latest version of Linkerd from thatHelmRepository
Expand to see the Linkerd manifests
---
apiVersion: v1
kind: Namespace
metadata:
  name: linkerd
  labels:
    config.linkerd.io/admission-webhooks: disabled
---
apiVersion: source.toolkit.fluxcd.io/v1beta2
kind: HelmRepository
metadata:
  name: linkerd
spec:
  interval: 1h
  url: https://helm.linkerd.io/stable
The value for the spec.values.identity.issuer.crtExpiry field below depends on the parameter value
used during the creation of the issuer certificate previously. In this example, it should be set to
1 year from the certificate creation.
---
apiVersion: helm.toolkit.fluxcd.io/v2beta1
kind: HelmRelease
metadata:
  name: linkerd
spec:
  interval: 10m
  chart:
    spec:
      chart: linkerd2
      reconcileStrategy: ChartVersion
      sourceRef:
        kind: HelmRepository
        name: linkerd
  install:
    crds: Create
  upgrade:
    crds: CreateReplace
  valuesFrom:
    - kind: Secret
      name: linkerd-certs
      valuesKey: ca.crt
      targetPath: identityTrustAnchorsPEM
    - kind: Secret
      name: linkerd-certs
      valuesKey: issuer.crt
      targetPath: identity.issuer.tls.crtPEM
    - kind: Secret
      name: linkerd-certs
      valuesKey: issuer.key
      targetPath: identity.issuer.tls.keyPEM
  values:
    installNamespace: false
    identity:
      issuer:
        crtExpiry: "2023-07-18T20:00:00Z" # Change this to match generated certificate expiry date
---
apiVersion: helm.toolkit.fluxcd.io/v2beta1
kind: HelmRelease
metadata:
  name: linkerd-viz
spec:
  interval: 10m
  dependsOn:
    - name: linkerd
  chart:
    spec:
      chart: linkerd-viz
      reconcileStrategy: ChartVersion
      sourceRef:
        kind: HelmRepository
        name: linkerd
Next, add the following file to instruct Kustomize to patch any Secrets that are referenced in
HelmRelease manifests, and add a Kustomization which references all the
other linkerd resource files.
Expand to see the linkerd Kustomization manifests
nameReference:
  - kind: Secret
    version: v1
    fieldSpecs:
      - path: spec/valuesFrom/name
        kind: HelmRelease
---
apiVersion: kustomize.config.k8s.io/v1beta1
kind: Kustomization
namespace: linkerd
configurations:
- kustomizeconfig.yaml
resources:
- namespace.yaml
- source.yaml
- releases.yaml
secretGenerator:
  - name: linkerd-certs
    files:
      - ca.crt
      - issuer.crt
      - issuer.key
The secretGenerator is used to generate Secrets from the generated files.
At this point linkerd directory in the cluster repository should look like this:
> tree linkerd
linkerd
├── ca.crt
├── issuer.crt
├── issuer.key
├── kustomization.yaml
├── kustomizeconfig.yaml
├── namespace.yaml
├── releases.yaml
└── source.yaml
Once Flux reconciles this directory to the cluster, Linkerd should be installed.
Before proceeding to the next step, check that all the Linkerd pods have started successfully:
> kubectl get pods -n linkerd
NAME                                      READY   STATUS    RESTARTS   AGE
linkerd-destination-66d5668b-4mw49        4/4     Running   0          10m
linkerd-identity-6b4658c74b-6nc97         2/2     Running   0          10m
linkerd-proxy-injector-6b76789cb4-8vqj4   2/2     Running   0          10m

> kubectl get pods -n linkerd-viz
NAME                            READY   STATUS    RESTARTS   AGE
grafana-db56d7cb4-xlnn4         2/2     Running   0          10m
metrics-api-595c7b564-724ps     2/2     Running   0          10m
prometheus-5d4dffff55-8fscd     2/2     Running   0          10m
tap-6dcb89d487-5ns8n            2/2     Running   0          10m
tap-injector-54895654bb-9xn7k   2/2     Running   0          10m
web-6b6f65dbc7-wltdg            2/2     Running   0          10m
Make sure that any new directories that you add to the cluster repository as part of this guide, are included in a path that Flux reconciles.
Installing Flagger using Flux
For the Flagger installation, a Kustomization file will be used to define the installation order and provide a default namespace for the installed resources.
Create a new flagger directory and make sure it is under a repository path that Flux reconciles.
We'll add the resources for Flagger under this directory. These are:
- A
Namespaceresource to control where the components are installed - A
HelmRepositoryresource to make the Flagger helm repo available on the cluster - A
HelmReleaseresource to install the latest version of Flagger and the load tester app, which is used to generate from that synthetic traffic during the analysis phase, from thatHelmRepository
Expand to see the Flagger resource manifests
---
apiVersion: v1
kind: Namespace
metadata:
  name: flagger
---
apiVersion: source.toolkit.fluxcd.io/v1beta2
kind: HelmRepository
metadata:
  name: flagger
spec:
  interval: 1h
  url: https://flagger.app
---
apiVersion: helm.toolkit.fluxcd.io/v2beta1
kind: HelmRelease
metadata:
  name: flagger
spec:
  releaseName: flagger
  install:
    crds: Create
  upgrade:
    crds: CreateReplace
  interval: 10m
  chart:
    spec:
      chart: flagger
      reconcileStrategy: ChartVersion
      sourceRef:
        kind: HelmRepository
        name: flagger
  values:
    metricsServer: http://prometheus.linkerd-viz:9090
    meshProvider: linkerd
---
apiVersion: helm.toolkit.fluxcd.io/v2beta1
kind: HelmRelease
metadata:
  name: loadtester
spec:
  interval: 10m
  chart:
    spec:
      chart: loadtester
      reconcileStrategy: ChartVersion
      sourceRef:
        kind: HelmRepository
        name: flagger
Finally, add the following Kustomization file that references all the previous files that were added:
Expand to see the Flagger Kustomization manifest
---
apiVersion: kustomize.config.k8s.io/v1beta1
kind: Kustomization
namespace: flagger
resources:
- namespace.yaml
- source.yaml
- releases.yaml
The flagger directory in the cluster repository should look like this:
> tree flagger
flagger
├── kustomization.yaml
├── namespace.yaml
├── releases.yaml
└── source.yaml
Once Flux reconciles this directory to the cluster, Flagger and the load tester app should get installed.
Before proceeding to the next step, check that all the Flagger pods have started successfully:
> kubectl get pods -n flagger
NAME                          READY   STATUS    RESTARTS   AGE
flagger-7d456d4fc7-knf2g      1/1     Running   0          4m
loadtester-855b4d77f6-scl6r   1/1     Running   0          4m
Deploy a canary release
To demonstrate the progressive rollout of an application, podinfo will be used.
We will configure a Canary release strategy, where Flagger will scale up a new version of the application (the canary), alongside the existing version (the primary), and gradually increase traffic to the new version in increments of 5%, up to a maximum of 50%. It will continuously monitor the new version for an acceptable request response rate and average request duration. Based on this analysis, Flagger will either update the primary to the new version, or abandon the promotion; then scale the canary back down to zero.
Create a new test directory and add the following Canary resources under it:
- A
Namespaceresource to control where the components are installed - A
DeploymentandHorizontalPodAutoscalerfor thepodinfoapplication - A
Canaryresource which references theDeploymentandHorizontalPodAutoscalerresources (note that we do not need to define a service resource, instead this is specified within the Canary definition and created by Flagger)
Expand to see the Canary resource manifests
---
apiVersion: v1
kind: Namespace
metadata:
  name: test
  annotations:
    linkerd.io/inject: enabled
---
apiVersion: apps/v1
kind: Deployment
metadata:
  name: podinfo
  labels:
    app: podinfo
spec:
  minReadySeconds: 5
  revisionHistoryLimit: 5
  progressDeadlineSeconds: 60
  strategy:
    rollingUpdate:
      maxUnavailable: 1
    type: RollingUpdate
  selector:
    matchLabels:
      app: podinfo
  template:
    metadata:
      annotations:
        prometheus.io/scrape: "true"
        prometheus.io/port: "9797"
      labels:
        app: podinfo
    spec:
      containers:
      - name: podinfod
        image: ghcr.io/stefanprodan/podinfo:6.1.8
        imagePullPolicy: IfNotPresent
        ports:
        - name: http
          containerPort: 9898
          protocol: TCP
        - name: http-metrics
          containerPort: 9797
          protocol: TCP
        - name: grpc
          containerPort: 9999
          protocol: TCP
        command:
        - ./podinfo
        - --port=9898
        - --port-metrics=9797
        - --grpc-port=9999
        - --grpc-service-name=podinfo
        - --level=info
        - --random-delay=false
        - --random-error=false
        env:
        - name: PODINFO_UI_COLOR
          value: "#34577c"
        livenessProbe:
          exec:
            command:
            - podcli
            - check
            - http
            - localhost:9898/healthz
          initialDelaySeconds: 5
          timeoutSeconds: 5
        readinessProbe:
          exec:
            command:
            - podcli
            - check
            - http
            - localhost:9898/readyz
          initialDelaySeconds: 5
          timeoutSeconds: 5
        resources:
          limits:
            cpu: 2000m
            memory: 512Mi
          requests:
            cpu: 100m
            memory: 64Mi

---
apiVersion: autoscaling/v2beta2
kind: HorizontalPodAutoscaler
metadata:
  name: podinfo
spec:
  scaleTargetRef:
    apiVersion: apps/v1
    kind: Deployment
    name: podinfo
  minReplicas: 2
  maxReplicas: 4
  metrics:
    - type: Resource
      resource:
        name: cpu
        target:
          type: Utilization
          # scale up if usage is above
          # 99% of the requested CPU (100m)
          averageUtilization: 99
---
apiVersion: flagger.app/v1beta1
kind: Canary
metadata:
  name: podinfo
spec:
  # deployment reference
  targetRef:
    apiVersion: apps/v1
    kind: Deployment
    name: podinfo
  # HPA reference (optional)
  autoscalerRef:
    apiVersion: autoscaling/v2beta2
    kind: HorizontalPodAutoscaler
    name: podinfo
  # the maximum time in seconds for the canary deployment
  # to make progress before it is rollback (default 600s)
  progressDeadlineSeconds: 60
  service:
    # ClusterIP port number
    port: 9898
    # container port number or name (optional)
    targetPort: 9898
  analysis:
    # schedule interval (default 60s)
    interval: 30s
    # max number of failed metric checks before rollback
    threshold: 5
    # max traffic percentage routed to canary
    # percentage (0-100)
    maxWeight: 50
    # canary increment step
    # percentage (0-100)
    stepWeight: 5
    # Linkerd Prometheus checks
    metrics:
    - name: request-success-rate
      # minimum req success rate (non 5xx responses)
      # percentage (0-100)
      thresholdRange:
        min: 99
      interval: 1m
    - name: request-duration
      # maximum req duration P99
      # milliseconds
      thresholdRange:
        max: 500
      interval: 30s
    # testing (optional)
    webhooks:
      - name: acceptance-test
        type: pre-rollout
        url: http://loadtester.flagger/
        timeout: 30s
        metadata:
          type: bash
          cmd: "curl -sd 'test' http://podinfo-canary.test:9898/token | grep token"
      - name: load-test
        type: rollout
        url: http://loadtester.flagger/
        metadata:
          cmd: "hey -z 2m -q 10 -c 2 http://podinfo-canary.test:9898/"
Finally, add a Kustomization file to apply all resources to the test namespace:
Expand to see the Canary Kustomization manifest
---
apiVersion: kustomize.config.k8s.io/v1beta1
kind: Kustomization
namespace: test
resources:
- namespace.yaml
- deployment.yaml
- canary.yaml
At this point test directory in the cluster repository should look like this:
> tree test
test
├── canary.yaml
├── deployment.yaml
├── kustomization.yaml
└── namespace.yaml
After a short time, the status of the canary object should be set to Initialized:

> kubectl get canary podinfo -n test
NAME      STATUS        WEIGHT   LASTTRANSITIONTIME
podinfo   Initialized   0        2022-07-22T12:37:58Z
Now trigger a new rollout by bumping the version of podinfo:
> kubectl set image deployment/podinfo podinfod=ghcr.io/stefanprodan/podinfo:6.0.1 -n test
During the progressive rollout, the canary object reports on its current status:
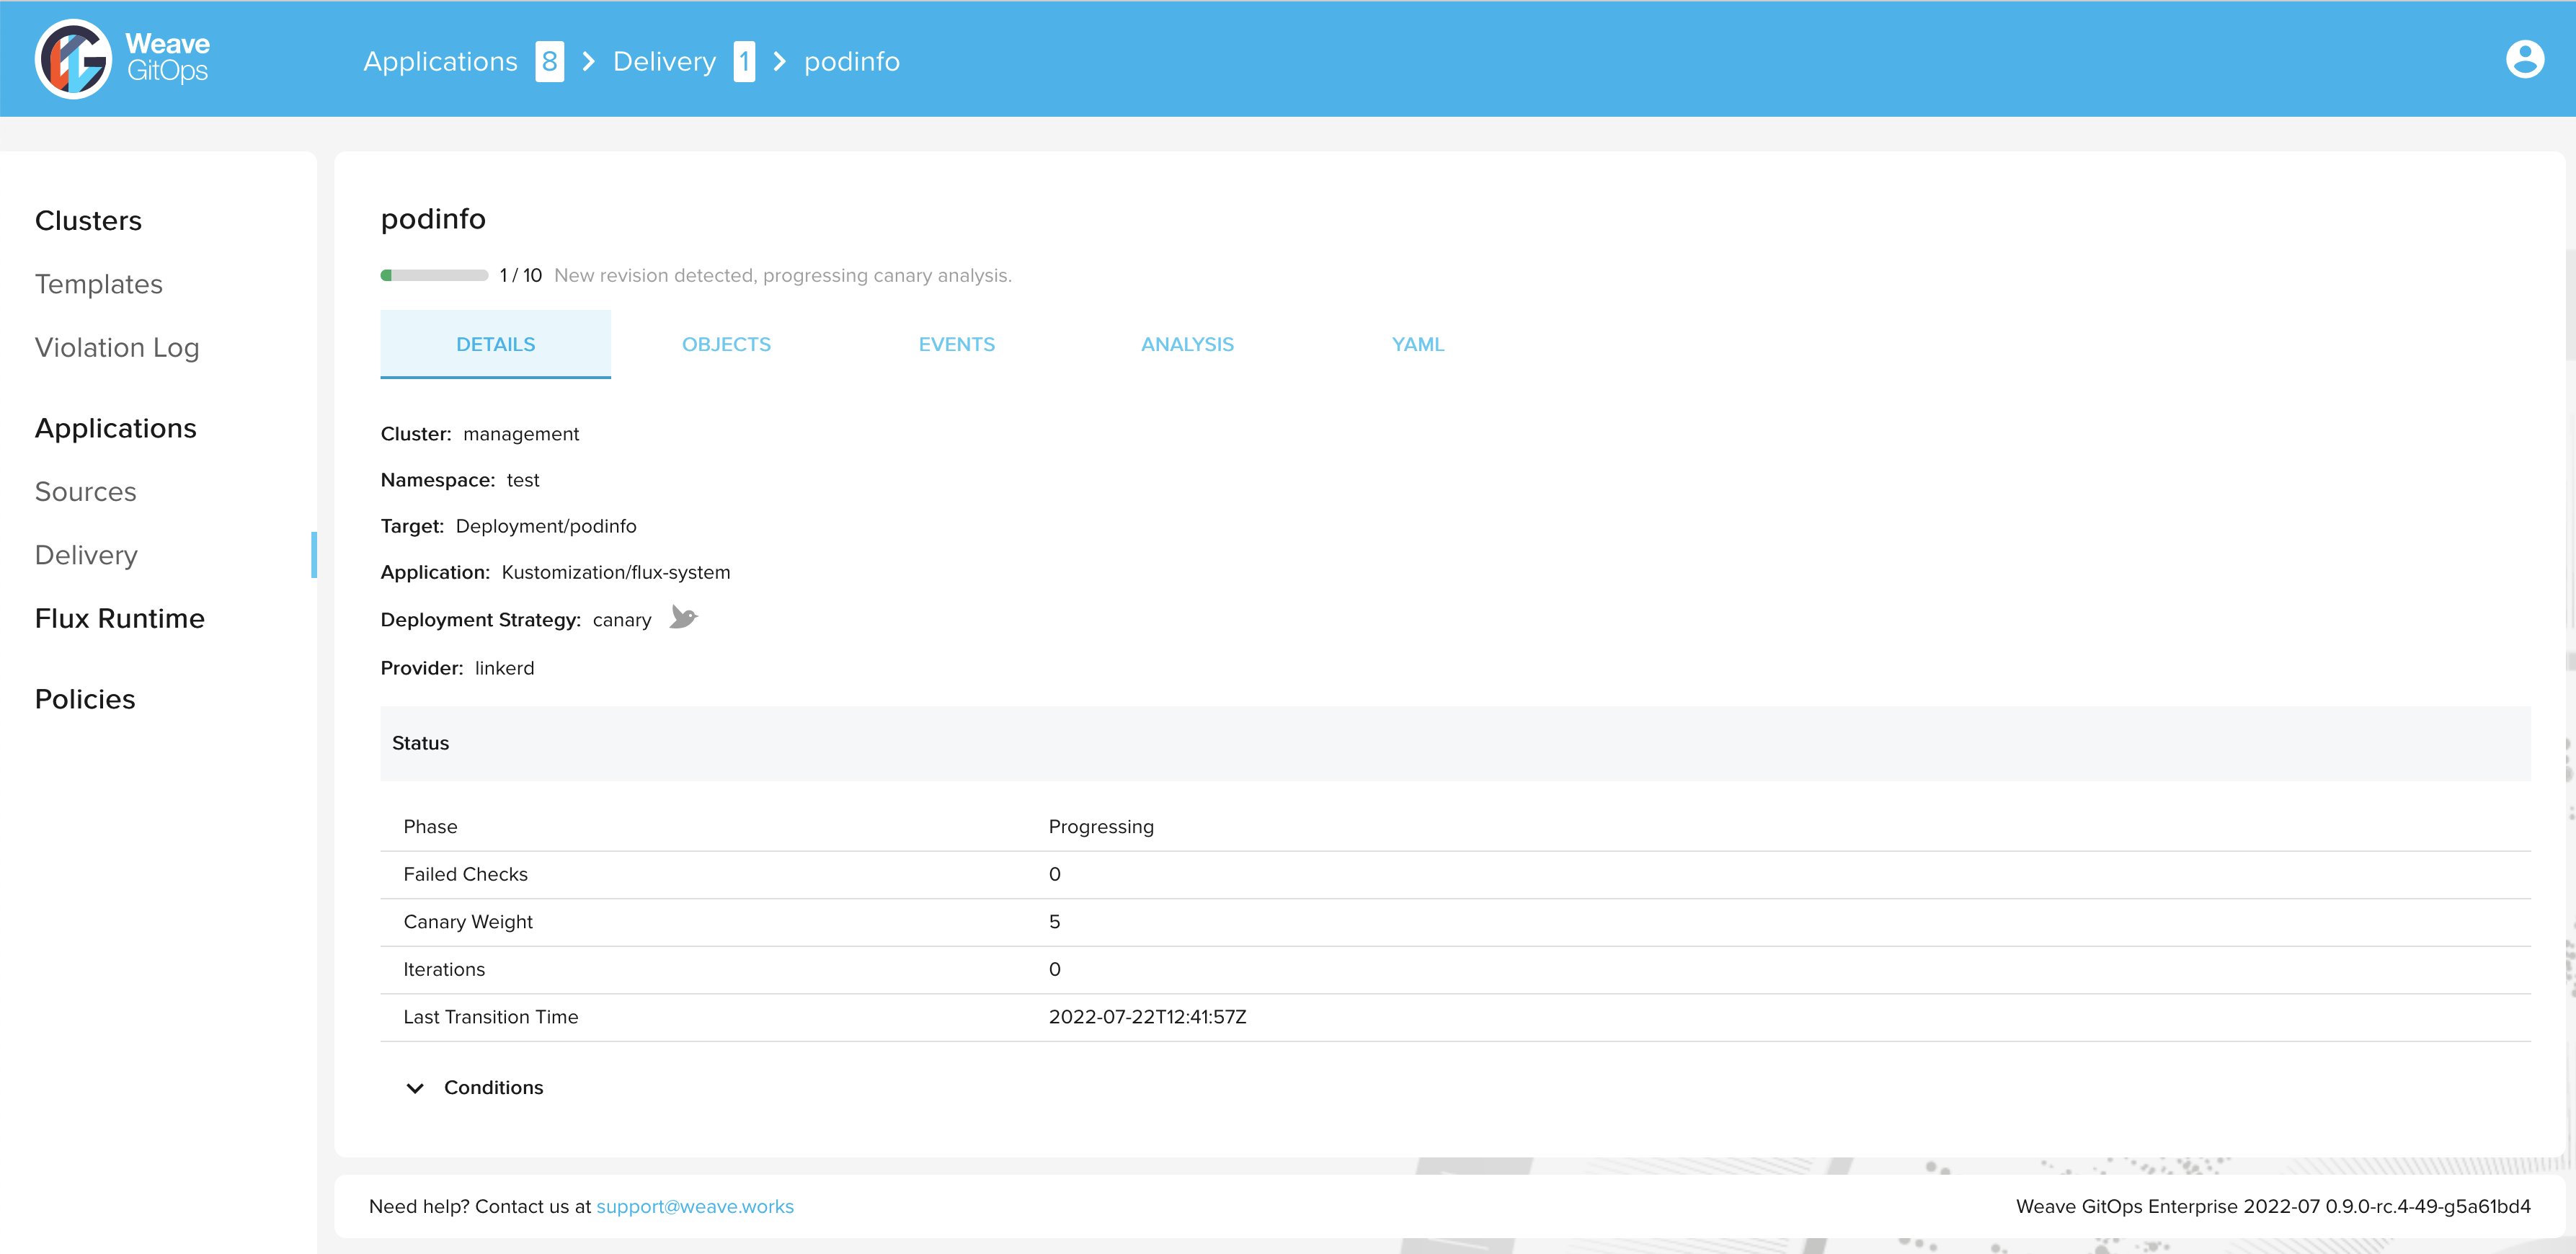
> kubectl get canary podinfo -n test
NAME      STATUS        WEIGHT   LASTTRANSITIONTIME
podinfo   Progressing   5       2022-07-22T12:41:57Z
After a short time the rollout is completed and the status of the canary object is set to
Succeeded:
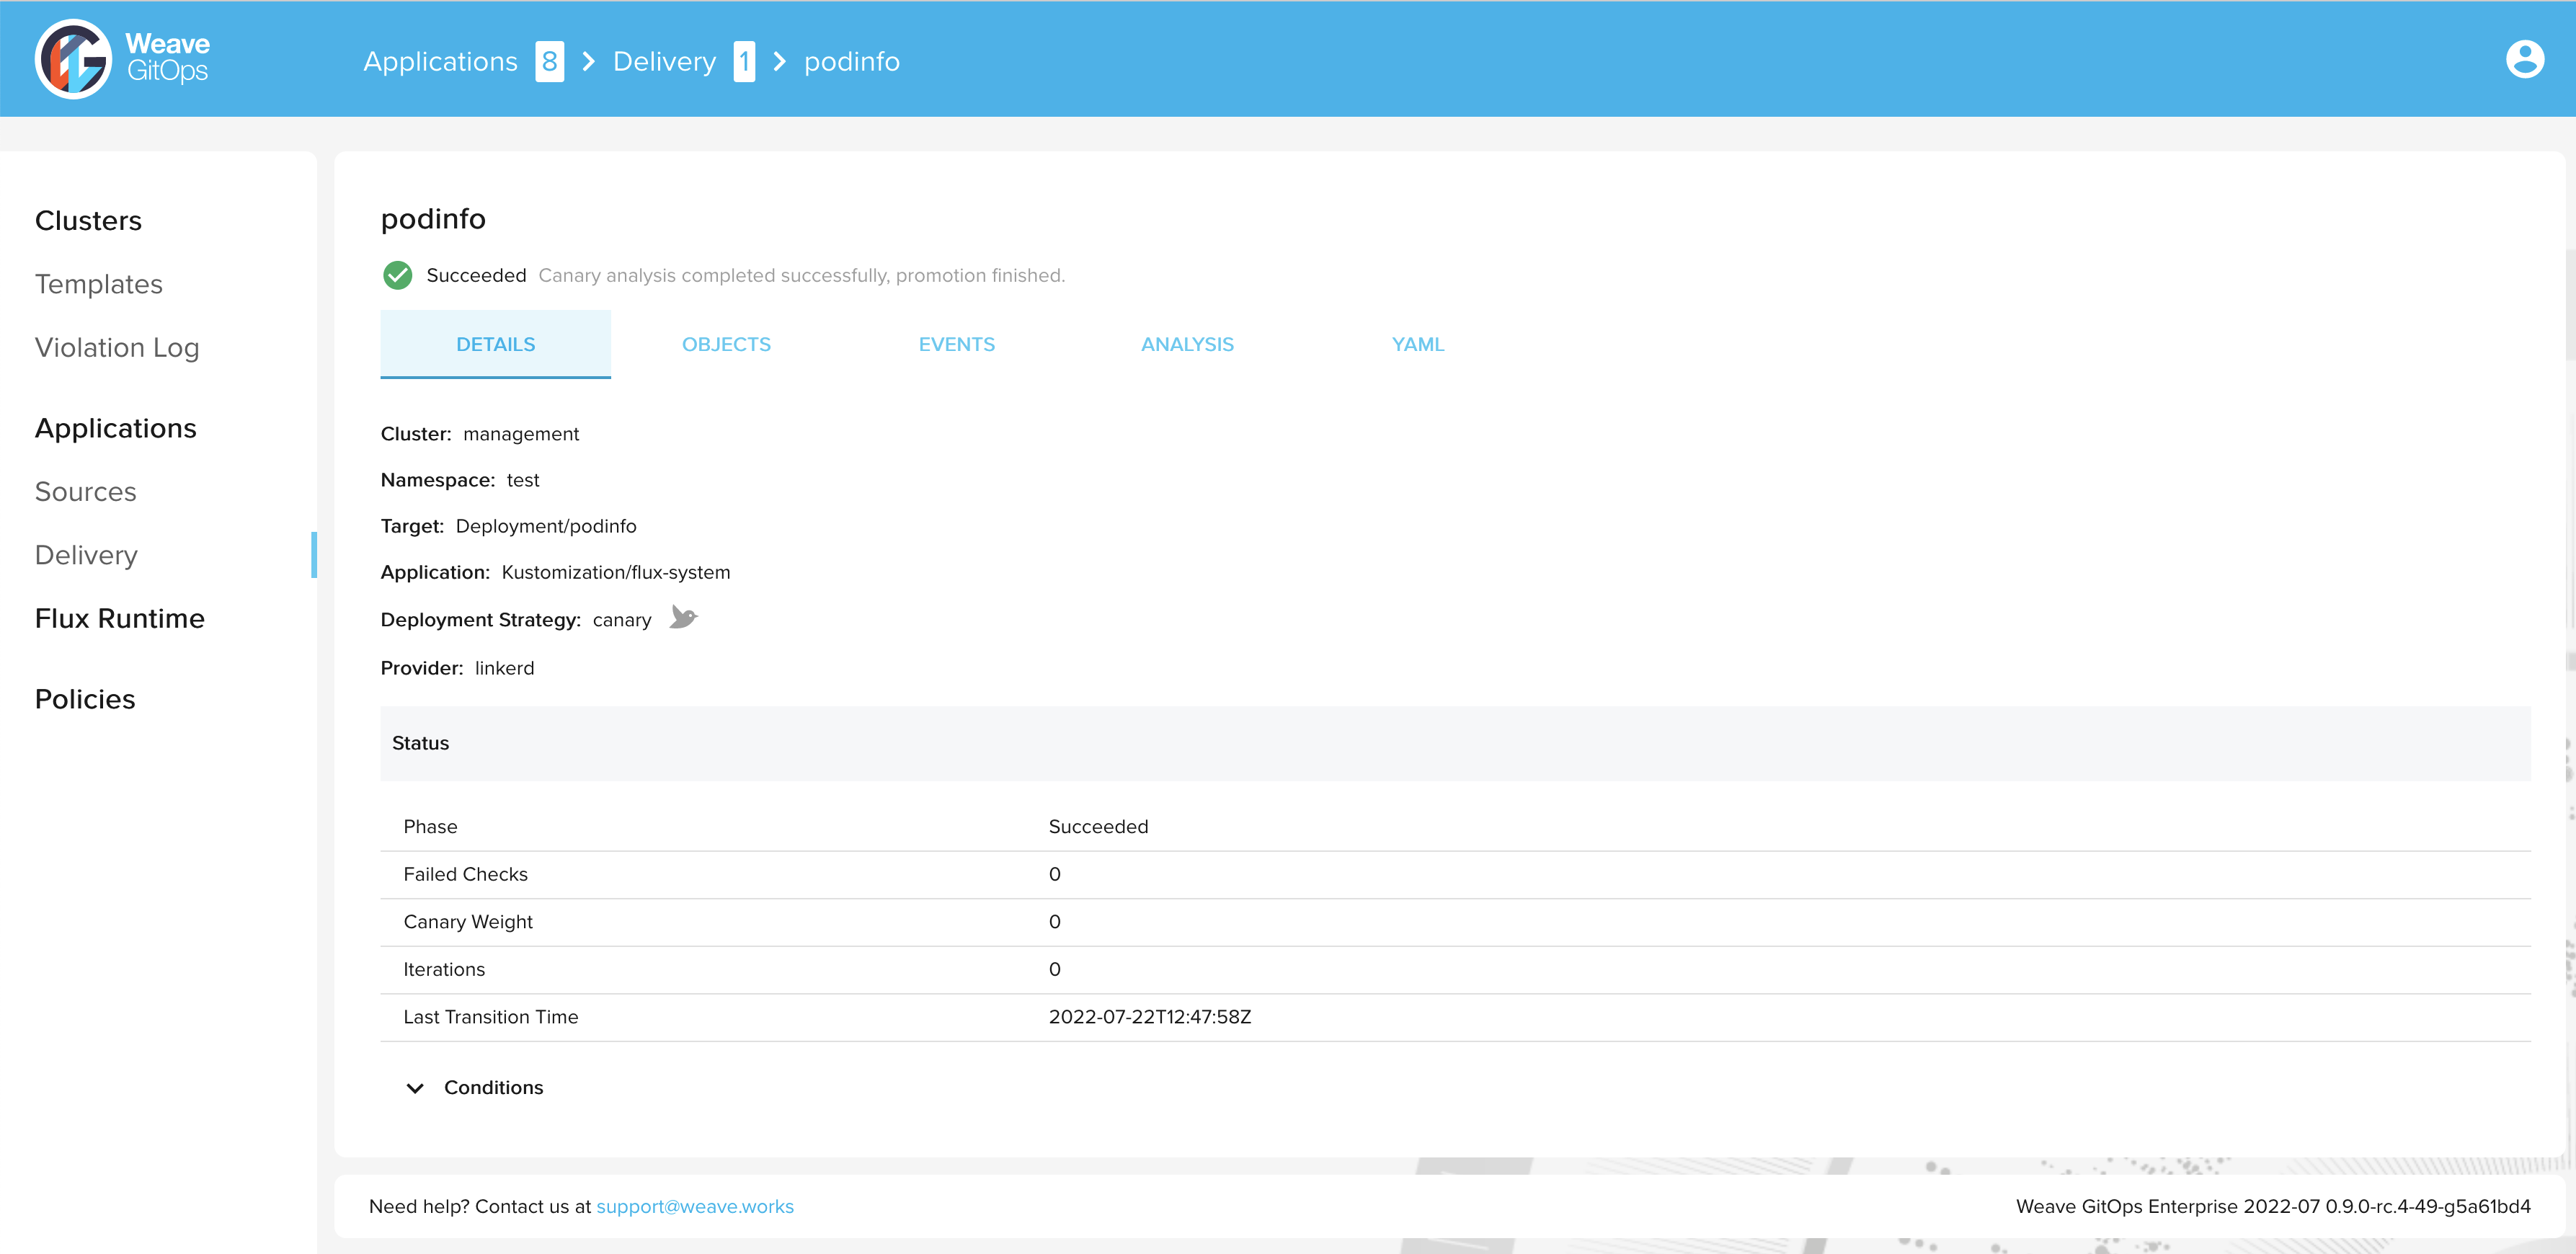
> kubectl get canary podinfo -n test
NAME      STATUS      WEIGHT   LASTTRANSITIONTIME
podinfo   Succeeded   0        2022-07-22T12:47:58Z
Summary
Congratulations, you have now completed a progressive delivery rollout with Flagger and Linkerd 🎉
Next steps:
- Explore more of what Flagger can offer
- Configure manual approving for progressive delivery deployments