Install Weave GitOps EnterpriseEnterprise
To purchase an entitlement to Weave GitOps Enterprise, please contact sales@weave.works.
Follow the instructions on this page to:
There is no need to install the open source version of Weave GitOps before installing Weave GitOps Enterprise.
Example: Set up a Management Cluster with CAPA and EKS
To get you started, we'll cover EKS as our management cluster with the CAPA provider. Please note again that Weave GitOps Enterprise supports clusters without Cluster API, as well as any combination of management cluster and CAPI provider.
Prep Step: Create a Repository
Create a new private GitHub repository and give it a name. We'll call our repo fleet-infra.
Set up a Git client for your private repo. For GitHub, see their docs on setting your username and setting your email address.
Cluster API provides declarative APIs, controllers, and tooling to manage the lifecycle of Kubernetes clusters, across a large number of infrastructure providers. The CAPI custom resource definitions are platform-independent as each provider implementation handles the creation of virtual machines, VPCs, networks, and other required infrastructure parts, enabling consistent and repeatable cluster deployments.
The following example and steps reflect Flux’s architecture and operations. Go here for more detailed documentation about Flux.
1. CAPA Setup
Cluster API requires kubectl access to an existing Kubernetes cluster. For this example, configure kubectl to use the management cluster:
export KUBECONFIG=/path/to/kubeconfig
After having configured kubectl, deploy the CAPA components by following the steps provided by Cluster API documentation.
2. Prepare IAM for Installation
Cluster API needs special permissions in AWS. Use the clusterawsadm command below to roll out a CloudStack and install the permissions into your AWS account. Although the CloudStack is bound to a region, the resulting permissions are globally scoped. You can use any AWS Region that you have access to.
The clusterawsadm command takes an AWSIAMConfiguration file. Cluster API docs provide the command for you; run this.
Run the clusterawsadm command to create an IAM group:
clusterawsadm bootstrap iam create-cloudformation-stack --config eks-config.yaml --region $REGION
Create an IAM User, which will be used as a kind of service account, and assign the newly created group to this user. The group name will be something like: cluster-api-provider-aws-s-AWSIAMGroupBootstrapper-XXXX.
Create a secret for the newly created IAM user.
3. Create the Cluster
In testing, we used the following values:
$INSTANCESIZE : t3.large
$NUMOFNODES : 2
$MINNODES : 2
$MAXNODES : 6
eksctl create cluster -n "$CLUSTERNAME" -r "$REGION" --nodegroup-name workers -t $INSTANCESIZE --nodes $NUMOFNODES --nodes-min $MINNODES --nodes-max $MAXNODES --ssh-access --alb-ingress-access
4. Add the Cluster to kubeconfig
Once you've created your cluster, add it to your kubeconfig:
aws eks --region "$REGION" update-kubeconfig --name "$CLUSTERNAME"
5. Install Flux Onto Your Cluster with the flux bootstrap Command
The flux bootstrap command enables you to deploy Flux on a cluster the GitOps way. Go here for more information about the flux bootstrap command.
- GitHub
- GitLab
flux bootstrap github \
  --owner=<github username> \
  --repository=fleet-infra \
  --branch=main \
  --path=./clusters/management \
  --personal \
  --components-extra image-reflector-controller,image-automation-controller
flux bootstrap gitlab \
  --owner=<gitlab username> \
  --repository=fleet-infra \
  --branch=main \
  --path=./clusters/management \
  --personal \
  --components-extra image-reflector-controller,image-automation-controller
Your private GitHub repo should have a clusters/management folder that includes the manifests Flux needs to operate, and that also generates a key value pair for Flux to access the repo.
- owner: The username (or organization) of the Git repository
- repository: Git repository name
- branch: Git branch (default "main")
- path: Path relative to the repository root; when specified, the cluster sync will be scoped to this path
- personal: If set, the owner is assumed to be a repo user
- components-extra: Additional controllers to install
At this point your Flux management cluster should be running. Take a look at the repository you created earlier.
6. Install CAPA
You do not need to install a CAPI provider to provision Kubernetes clusters using Weave GitOps Enterprise—you can also provision with Terraform. But for this example with CAPA, you must.
Download a specific version of clusterctl from the releases page. We've tested the example templates provided in this guide with clusterctl version 1.1.3.
Next, run this command:
export EXP_EKS=true
export EXP_MACHINE_POOL=true
export CAPA_EKS_IAM=true
export EXP_CLUSTER_RESOURCE_SET=true

clusterctl init --infrastructure aws
Please note that, while the next few steps apply to our example, they are also relevant whether you're using another CAPI provider or none at all.
Apply the Entitlements Secret
Contact sales@weave.works for a valid entitlements secret. Then apply it to the cluster:
kubectl apply -f entitlements.yaml
Configure Access for Writing to Git from the Weave GitOps Enterprise UI
Here we provide guidance for GitHub, GitLab, BitBucket Server, and Azure DevOps.
- GitHub
- GitLab
- BitBucket Server
- Azure DevOps
Create a GitLab OAuth application that will request api permissions to create pull requests on your behalf.
Follow the GitLab docs.
The application should have at least these scopes:
apiopenidemailprofile
Add callback URLs to the application for each address the UI will be exposed on, e.g.:
https://localhost:8000/oauth/gitlabfor port-forwarding and testinghttps://git.example.com/oauth/gitlabfor production use
Save your application, taking note of the Client ID and Client Secret. Save
them into the git-provider-credentials secret, along with:
GIT_HOST_TYPESto tell WGE that the host is gitlabGITLAB_HOSTNAMEwhere the OAuth app is hosted
Replace values in this snippet and run:
kubectl create secret generic git-provider-credentials --namespace=flux-system \
  --from-literal="GITLAB_CLIENT_ID=13457" \
  --from-literal="GITLAB_CLIENT_SECRET=24680" \
  --from-literal="GITLAB_HOSTNAME=git.example.com" \
  --from-literal="GIT_HOST_TYPES=git.example.com=gitlab"
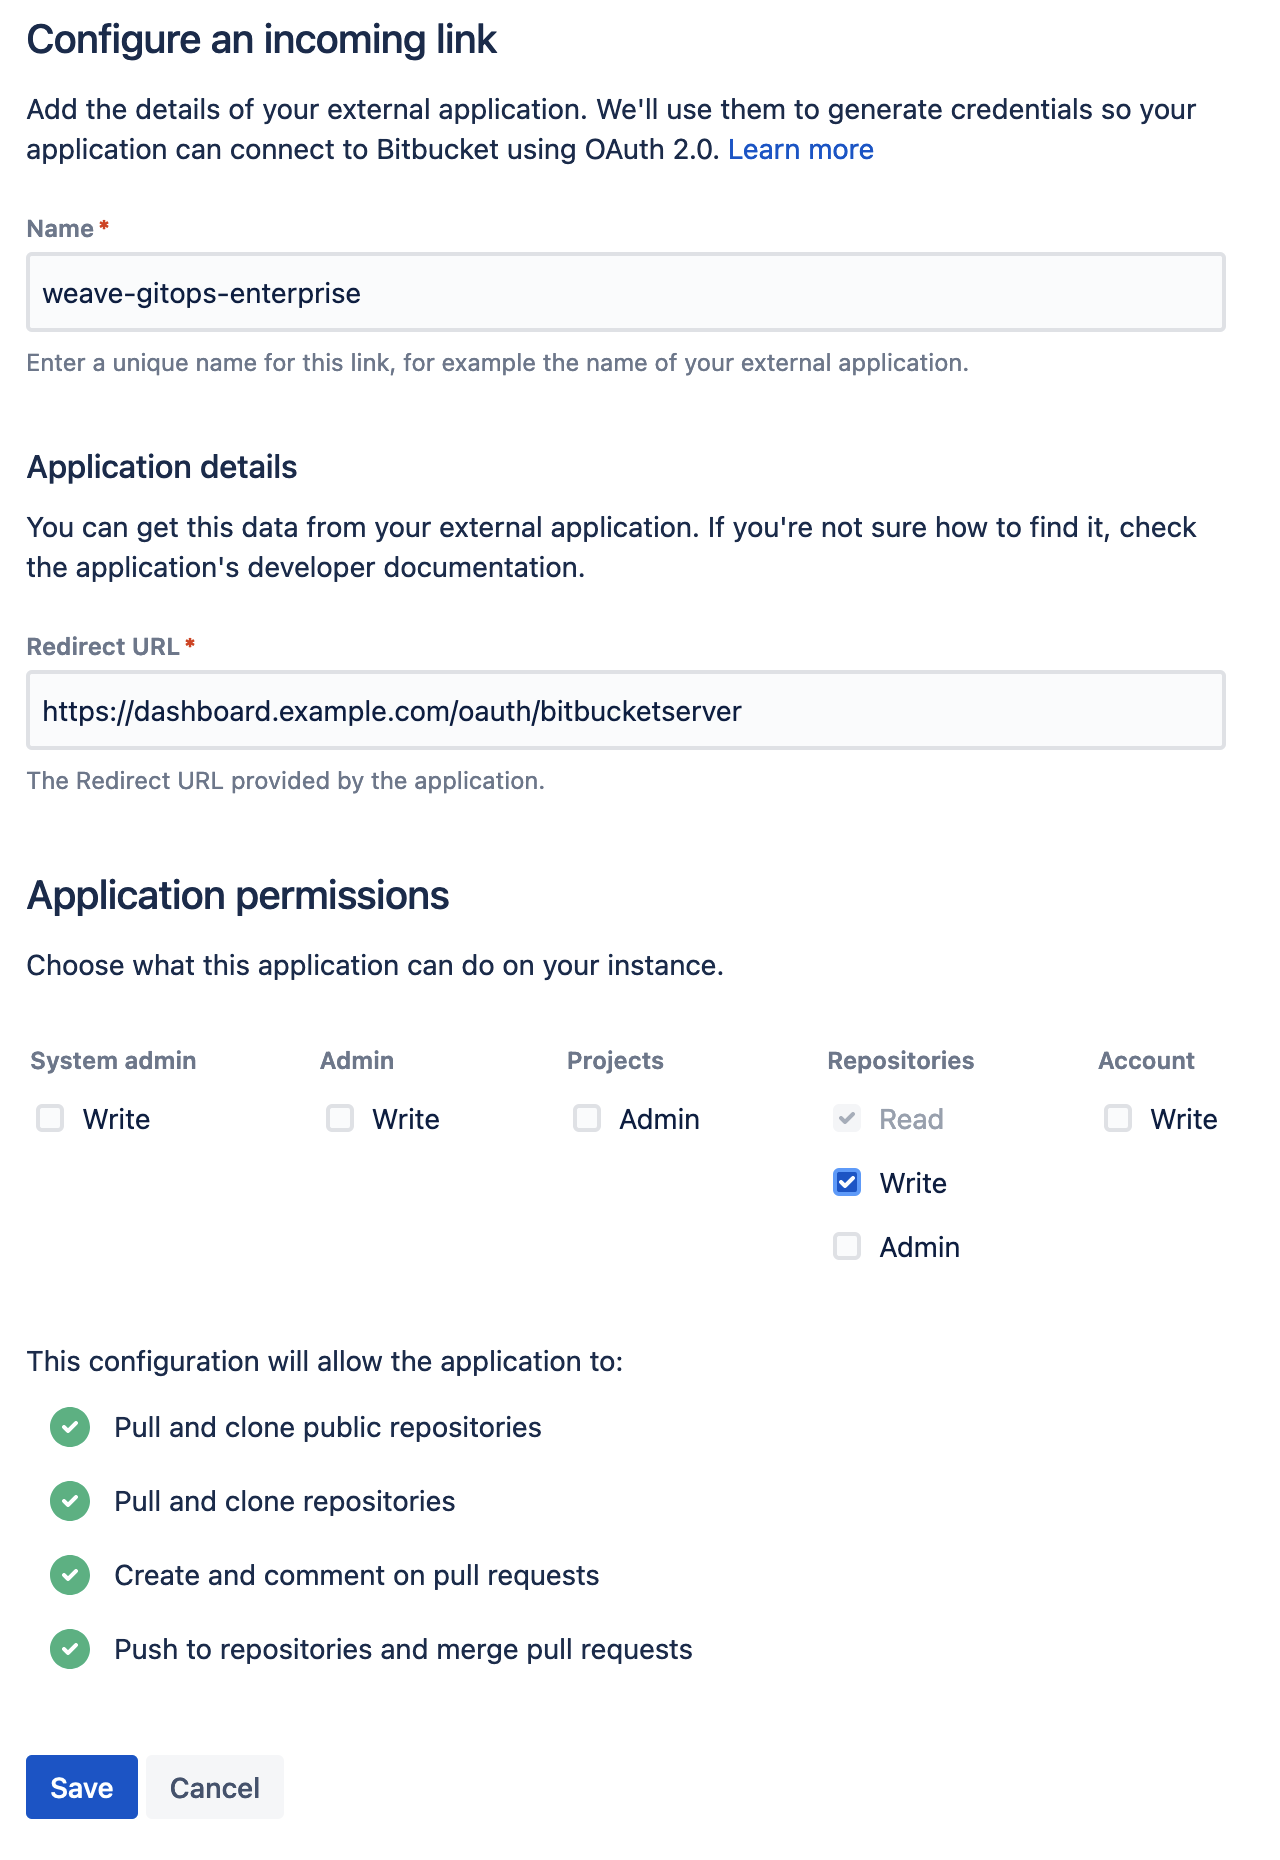
Create a new incoming application link from
the BitBucket administration dashboard. You will be asked to enter a unique name and the redirect URL for the external application. The redirect URL
should be set to <WGE dashboard URL>/oauth/bitbucketserver. You will also need to select permissions for the application. The minimum set of
permissions needed for WGE to create pull requests on behalf of users is Repositories - Write. An example of configuring these settings is shown below.
Save your application and take note of the Client ID and Client Secret. Save
them into the git-provider-credentials secret, along with:
GIT_HOST_TYPESto tell WGE that the host is bitbucket-serverBITBUCKET_SERVER_HOSTNAMEwhere the OAuth app is hosted
Replace values in this snippet and run:
kubectl create secret generic git-provider-credentials --namespace=flux-system \
  --from-literal="BITBUCKET_SERVER_CLIENT_ID=13457" \
  --from-literal="BITBUCKET_SERVER_CLIENT_SECRET=24680" \
  --from-literal="BITBUCKET_SERVER_HOSTNAME=git.example.com" \
  --from-literal="GIT_HOST_TYPES=git.example.com=bitbucket-server"
If the secret is already present, use the following command to update it using your default editor:
kubectl edit secret generic git-provider-credentials --namespace=flux-system
If BitBucket Server is running on the default port (7990), make sure you include the port number in the values of the secret. For example: GIT_HOST_TYPES=git.example.com:7990=bitbucket-server
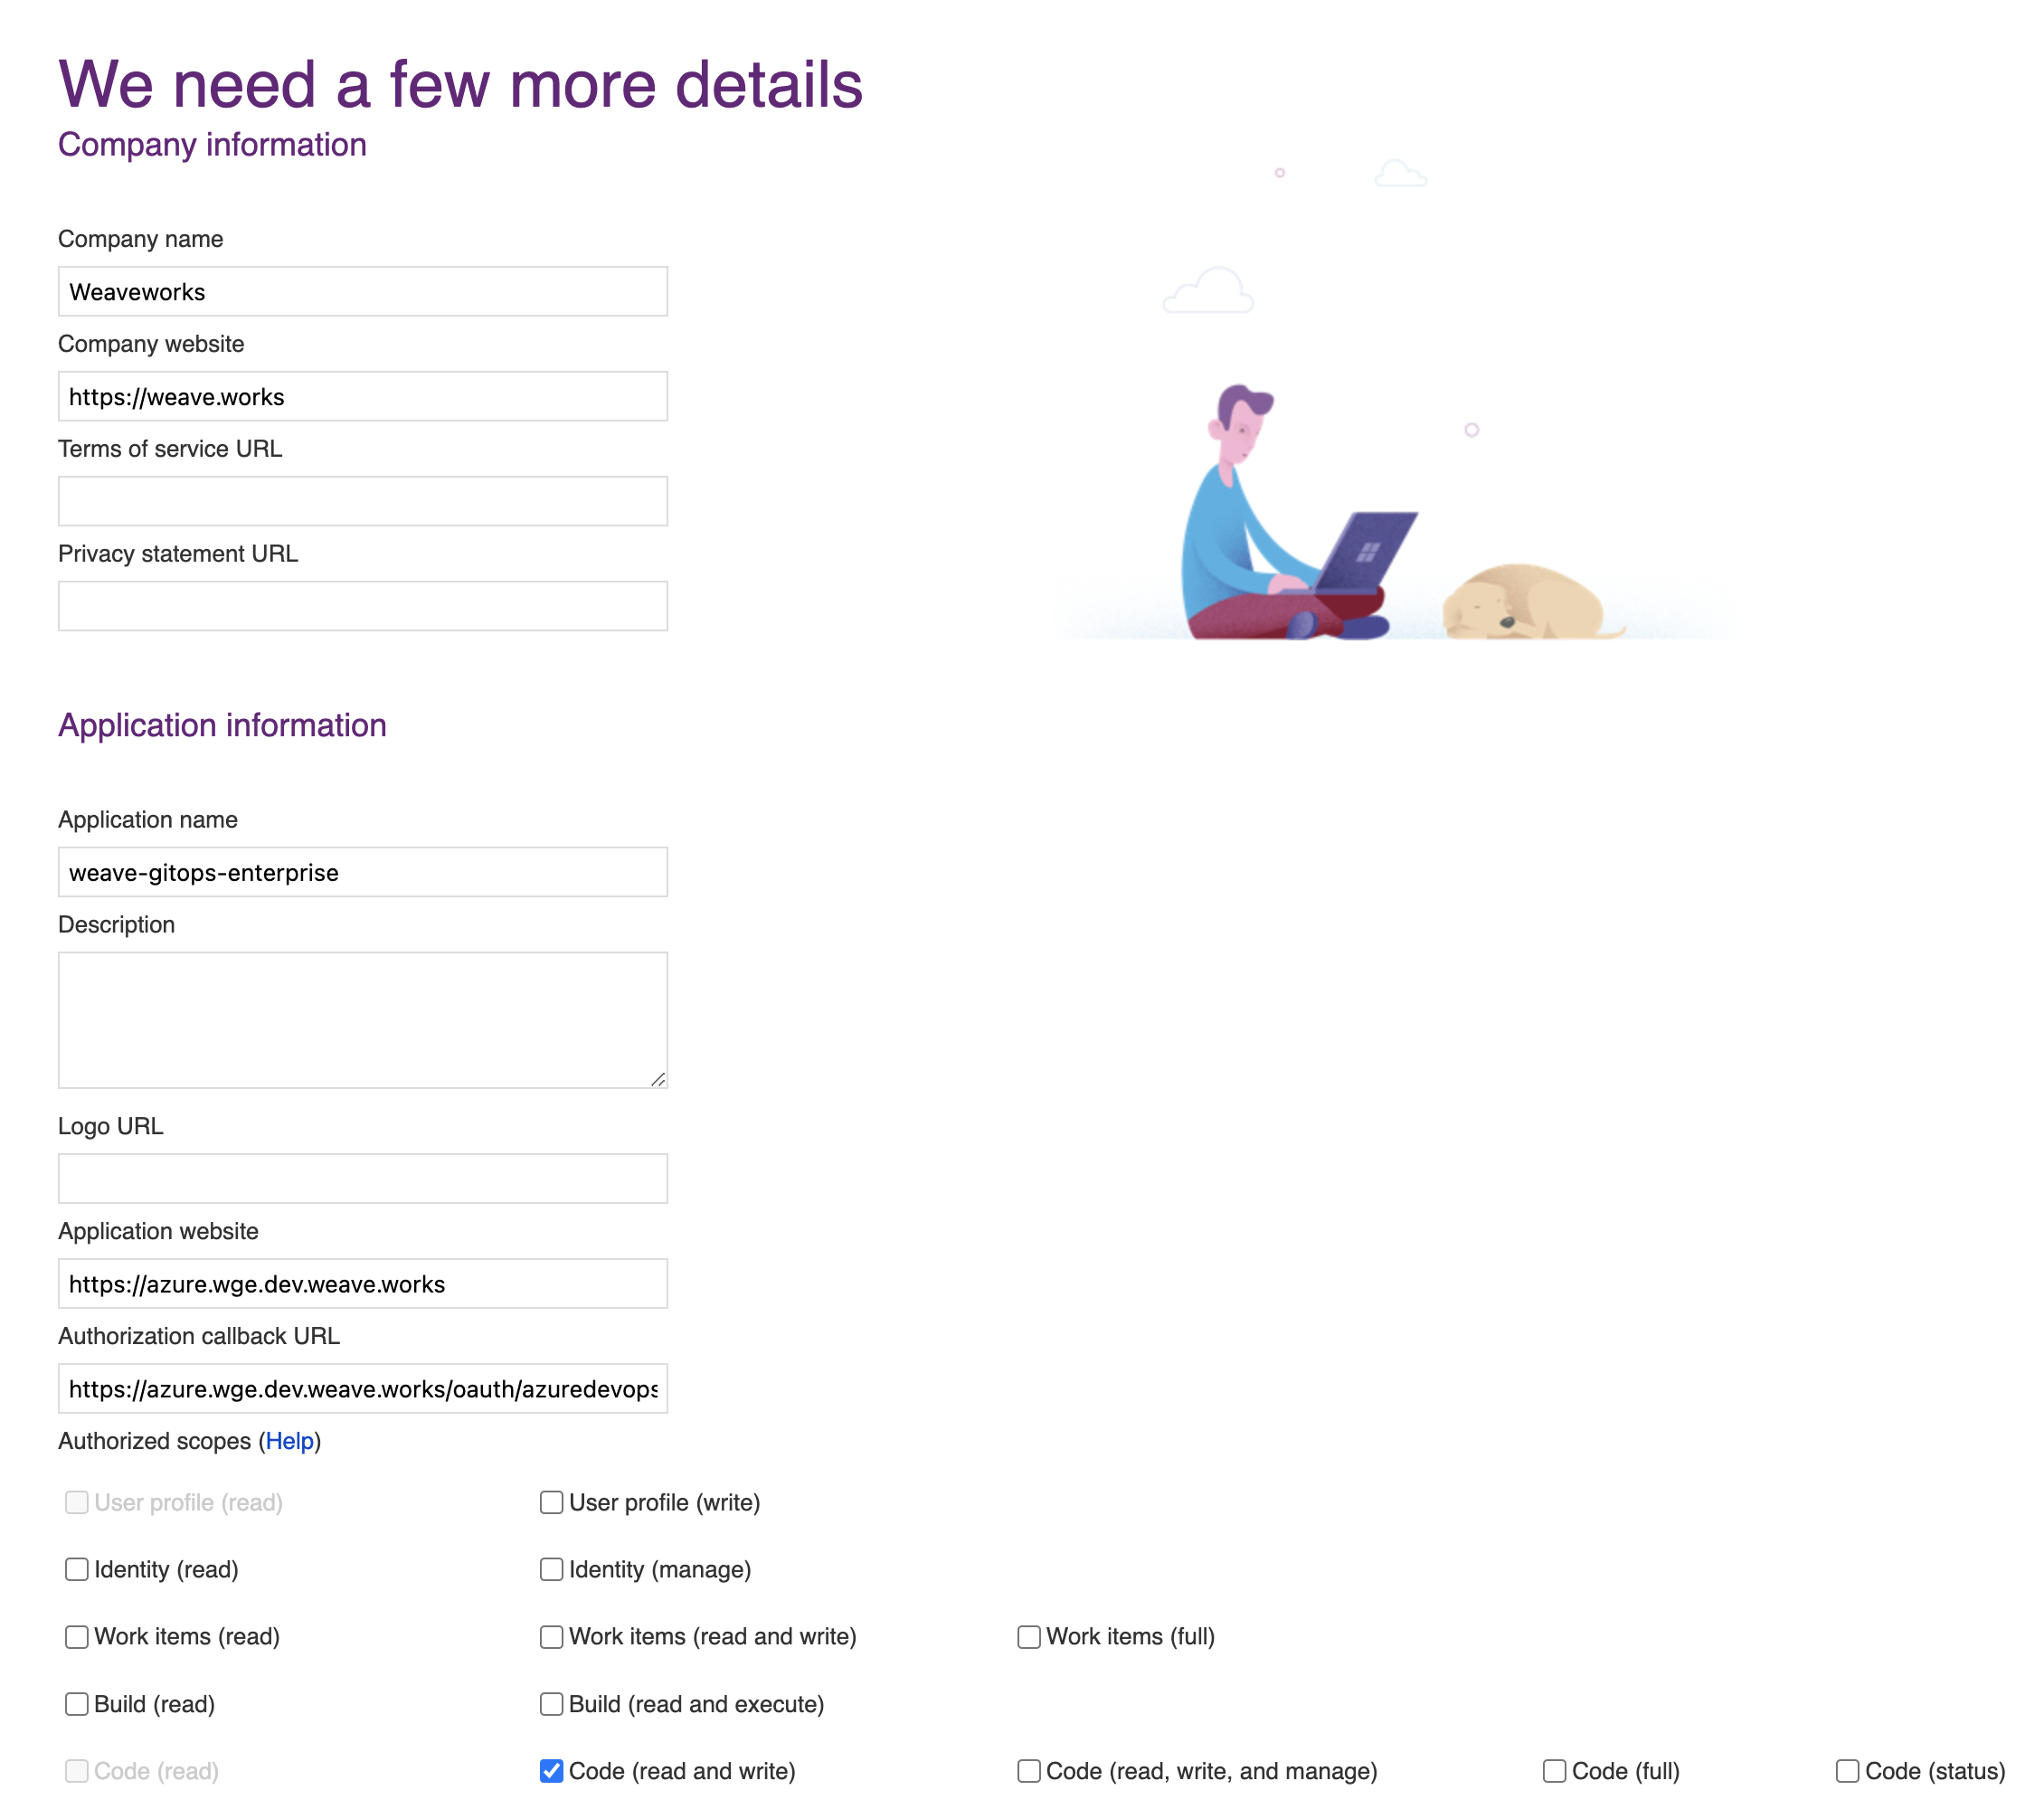
Navigate to VisualStudio and register a new application, as explained in the docs. Set the authorization callback URL and select which scopes to grant. Set the callback URL to <WGE dashboard URL>/oauth/azuredevops.
Select the Code (read and write) scope from the list. This is necessary so that WGE can create pull requests on behalf of users. An example of configuring these settings is shown below.
After creating your application, you will be presented with the application settings. Take note of the App ID and Client Secret values—you will use them to configure WGE.
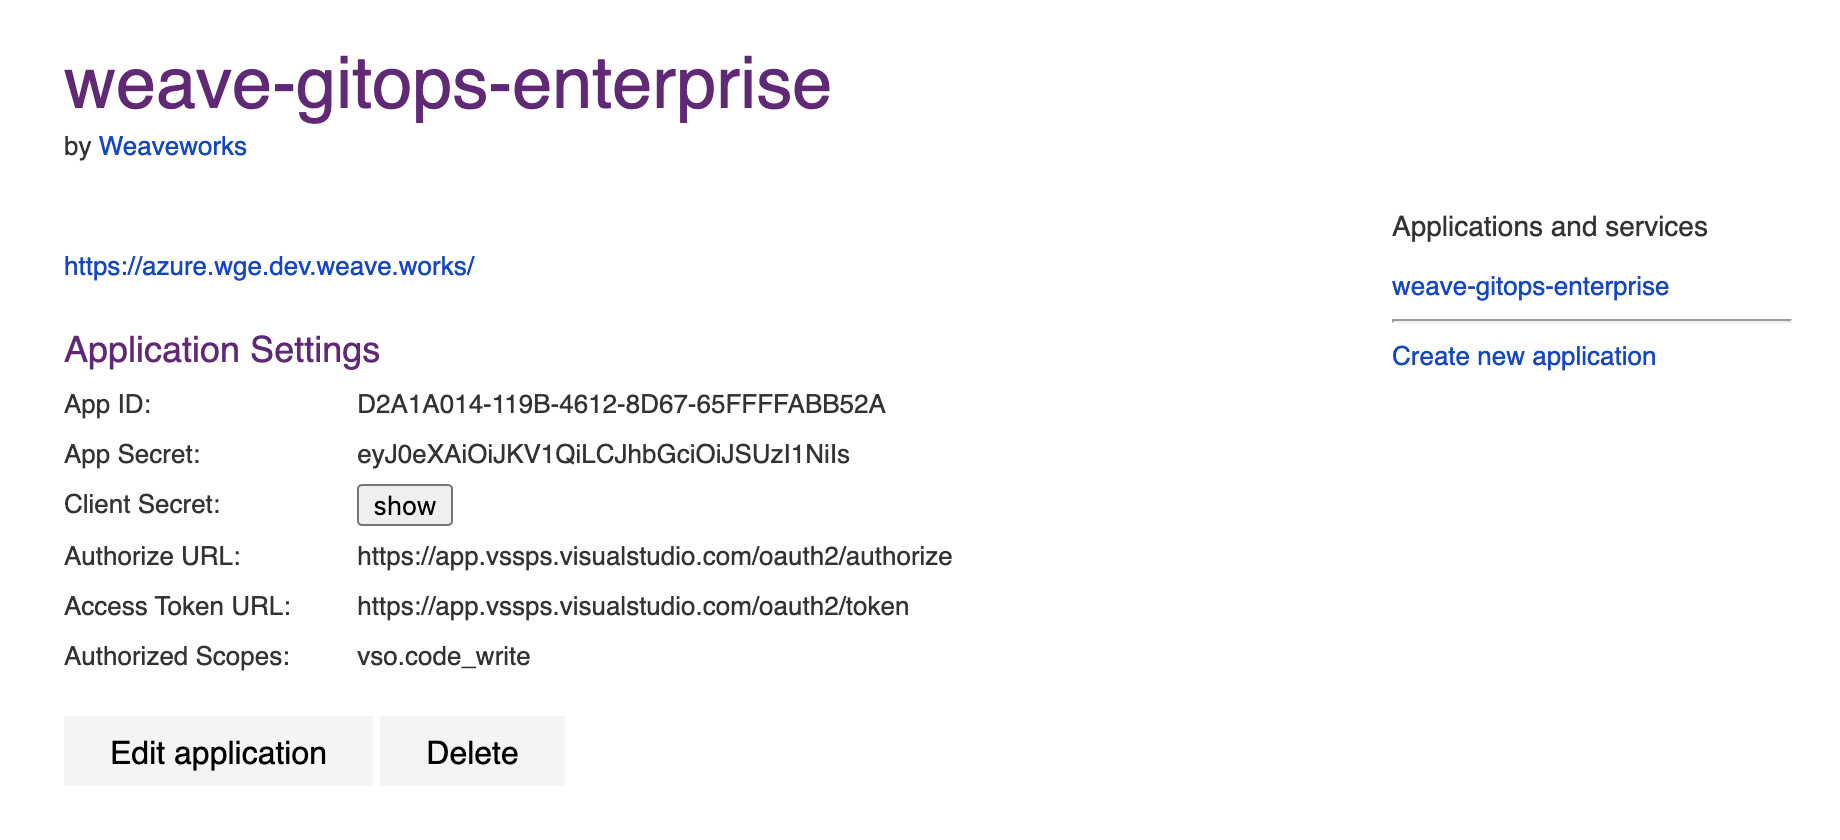
In your cluster, create a secret named git-provider-credentials that contains the App ID and Client Secret values from the newly created application.
Replace values in this snippet and run:
kubectl create secret generic git-provider-credentials --namespace=flux-system \
  --from-literal="AZURE_DEVOPS_CLIENT_ID=<App ID value>" \
  --from-literal="AZURE_DEVOPS_CLIENT_SECRET=<Client Secret value>"
WGE is now configured to ask users for authorization the next time a pull request must be created as part of using a template. Note that each user can view and manage which applications they have authorized by navigating to https://app.vsaex.visualstudio.com/me.
Configure Helm Chart and Commit
We deploy WGE via a Helm chart. We'll save and adapt the below template before committing it in Git to a Flux-reconciled path.
Clone the newly created repo locally. We're gonna add some things!
git clone git@<provider>:<username>/fleet-infra
cd fleet-infra
Download the helm-release to clusters/management/weave-gitops-enterprise.yaml.
Expand to see file contents
apiVersion: source.toolkit.fluxcd.io/v1beta2
kind: HelmRepository
metadata:
  name: weave-gitops-enterprise-charts
  namespace: flux-system
spec:
  interval: 60m
  secretRef:
    name: weave-gitops-enterprise-credentials
  url: https://charts.dev.wkp.weave.works/releases/charts-v3
---
apiVersion: helm.toolkit.fluxcd.io/v2beta1
kind: HelmRelease
metadata:
  name: weave-gitops-enterprise
  namespace: flux-system
spec:
  chart:
    spec:
      interval: 65m
      chart: mccp
      sourceRef:
        kind: HelmRepository
        name: weave-gitops-enterprise-charts
        namespace: flux-system
      version: 0.x.x
  install:
    crds: CreateReplace
  upgrade:
    crds: CreateReplace
  interval: 50m
  values:
    # -- Configure TLS settings if needed
    # tls:
      # -- Can be disabled if TLS is handled by a user-provided ingress controller
      # enabled: true
      # -- optionally specify a TLS secret
      # secretName: null
    config:
      capi:
        repositoryURL: https://github.com/$GITHUB_USER/fleet-infra
        # -- Can be changed depending on your git repo structure
        # repositoryPath: ./clusters/management/clusters
        # repositoryClustersPath: ./cluster
      git:
        type: github
        # -- Change if using on-prem github/gitlab
        # hostname: https://github.com
Once you have copied the above file, open and adjust the following configuration options:
values.config.capi.repositoryURL
Ensure this has been set to your repository URL.
values.config.capi.repositoryPath
By default, WGE will create new clusters in the clusters/management/clusters path.
You can configure it with values.config.capi.repositoryPath.
You might what to change it to clusters/my-cluster/cluster if you configured Flux to reconcile ./clusters/my-cluster instead.
values.config.capi.repositoryClustersPath
The other important path to configure is where you'll store applications and workloads run on the new cluster.
By default this is ./clusters. When a new cluster is specified, any selected profiles will be written to ./clusters/{.namespace}/{.clusterName}/profiles.yaml.
When the new cluster is bootstrapped, Flux will sync the ./clusters/{.namespace}/{.clusterName} path.
(Optional) Install policy agent
Policy agent comes packaged with the WGE chart. To install it, set the following values:
values.policy-agent.enabled: set to true to install the agent with WGEvalues.policy-agent.config.accountId: organization name, used as identifiervalues.policy-agent.config.clusterId: unique identifier for the cluster
Commit and push all the files
git add clusters/management/weave-gitops-enterprise.yaml
git commit -m "Deploy Weave GitOps Enterprise"
git push
Flux will reconcile the helm-release and WGE will be deployed into the cluster. You can check the flux-system namespace to verify all pods are running.
Configure Your Password
To login to the WGE UI, generate a bcrypt hash for your chosen password and store it as a secret in the Kubernetes cluster. There are several different ways to generate a bcrypt hash. Here, we'll use gitops get bcrypt-hash from our CLI.
PASSWORD="<Make up and insert a brand-new password here>"
echo -n $PASSWORD | gitops get bcrypt-hash | kubectl create secret generic cluster-user-auth -n flux-system --from-literal=username=wego-admin --from-file=password=/dev/stdin
A validation to know it’s working:
kubectl get secret -n flux-system cluster-user-auth
Install the Weave GitOps Enterprise CLI Tool
To do this, you can use either brew or curl.
- Homebrew
- curl
brew install weaveworks/tap/gitops-ee
curl --silent --location "https://artifacts.wge.dev.weave.works/releases/bin/0.27.0/gitops-$(uname)-$(uname -m).tar.gz" | tar xz -C /tmp
sudo mv /tmp/gitops /usr/local/bin
gitops version
Next Steps
Here are a couple of options for you to take your next steps with WGE. Explore one option or all of them, in no particular order.
- Cluster Management: We'll show you how to join WGE to a cluster and install an application on that cluster without using Cluster API. But if you prefer using Cluster API, our docs cover that too.
- Install the Terraform Controller to reconcile your Terraform resources in a GitOps way. With Flux and the TF Controller, WGE makes it easy to add Terraform templates to your clusters and continuously reconcile any changes made to the Terraform source manifest.
- Install Policy agent, which comes packaged with the WGE chart.